The Thermodynamics of Home Health: Building a Mold Risk Monitor in Home Assistant
Stop mold before it starts! This guide shows how to calculate Dew Point and Surface Humidity in Home Assistant using your thermostat and wall sensors. Learn the physics behind the 80% risk threshold and get the YAML code to automate your home’s protection against hidden dampness.
Most homeowners wait for the smell of mildew or the sight of black spots to take action. By then, it’s too late—the colony is established. To truly prevent mold, we need to look at the micro-climate existing in the two-millimeter layer of air touching your exterior walls.
In this guide, we will use Home Assistant to bridge the gap between basic sensor data and thermodynamic reality.
How It All Started: From a Dark Patch to a HA Solution
It started with that unmistakable musty smell and a dark, damp patch discovered behind a cabinet on an exterior wall. Like many, my first instinct was to just clean it and move on, but I wanted to understand why it was happening.
After some deep-dive research into building physics, I learned that mold doesn't wait for condensation—it starts growing as soon as the air near a surface hits 80% humidity. I decided to stop guessing and start measuring.
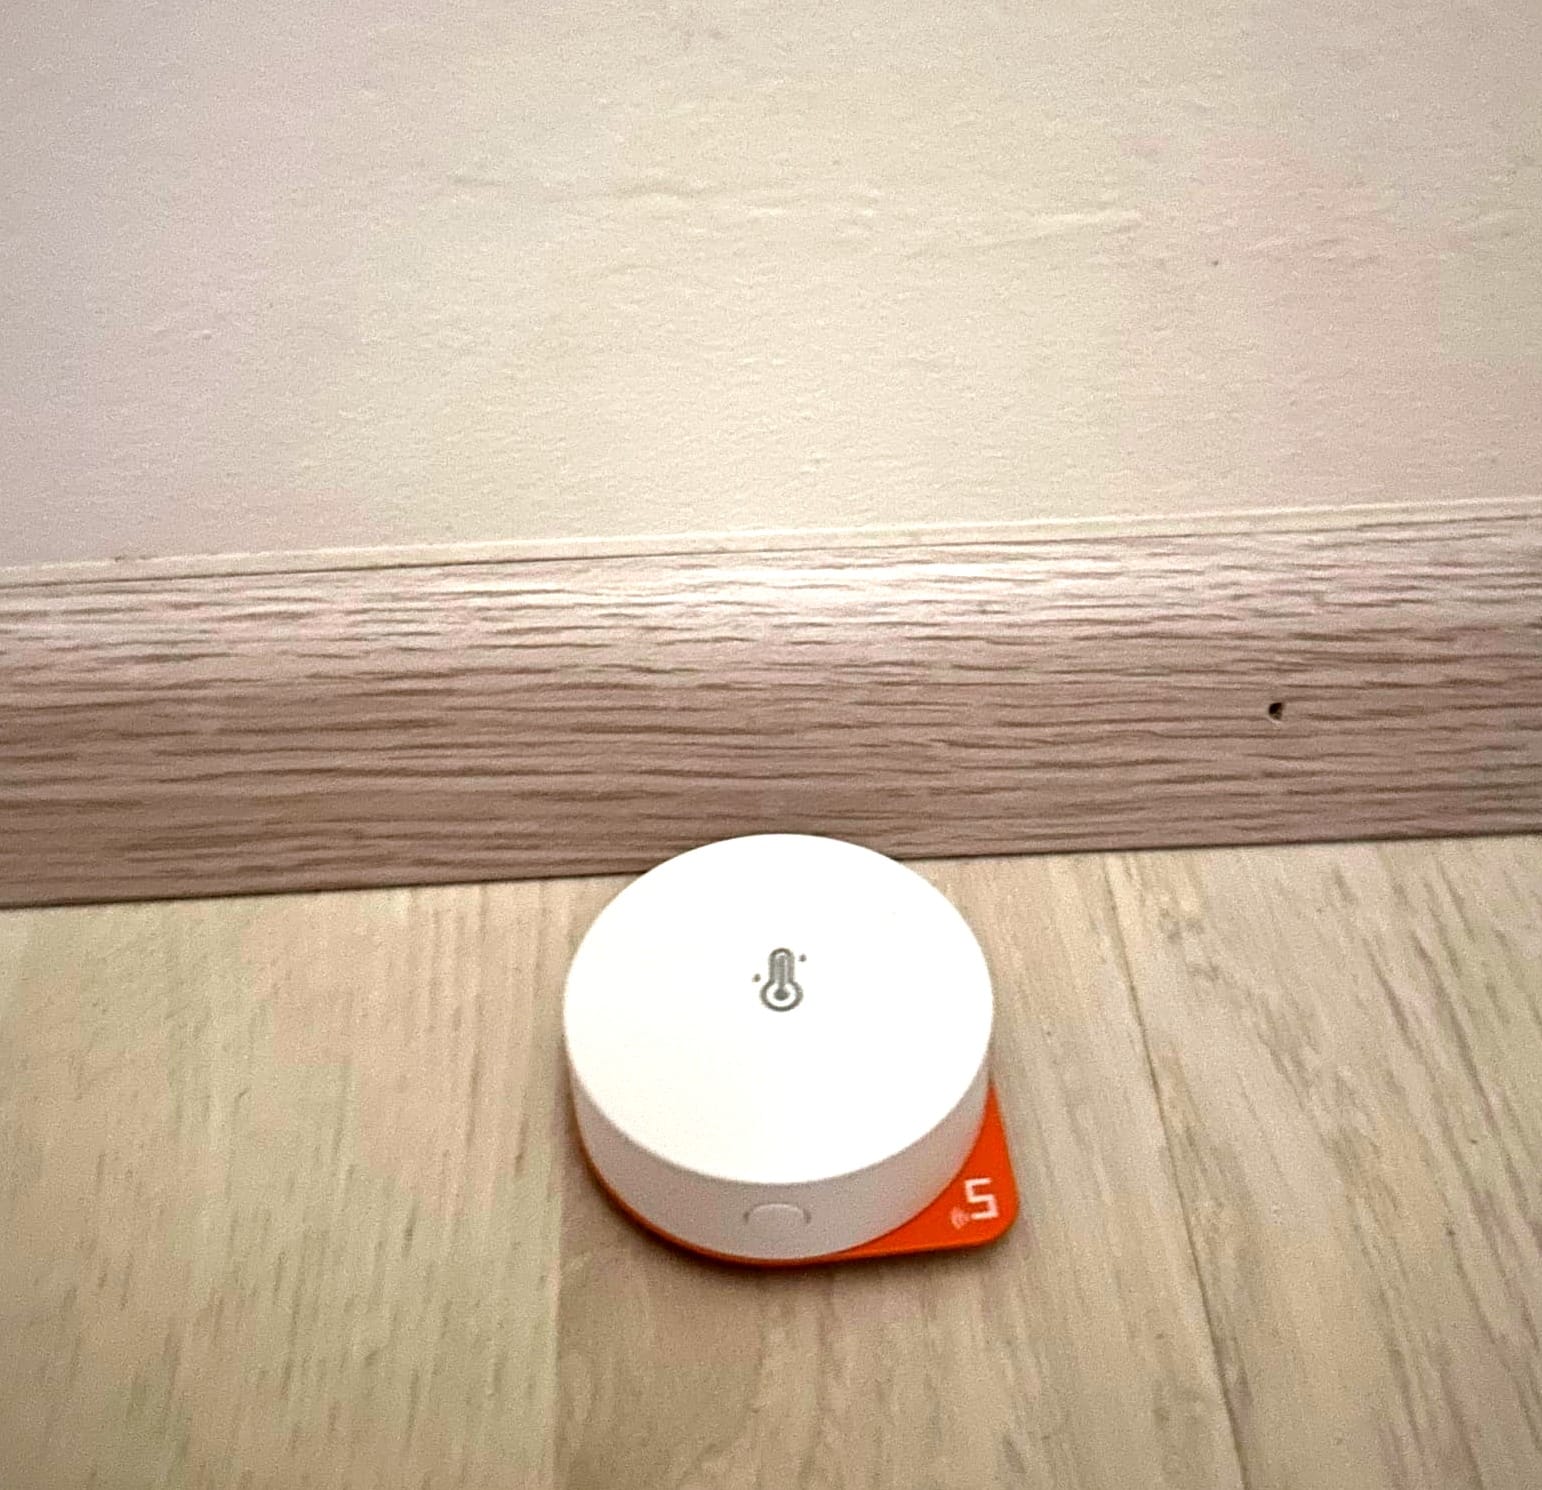
My experiment setup:
- The Gear: I bought a dedicated Zigbee temperature sensor.
- The Placement: I mounted it directly below the "cold" spot of the wall.
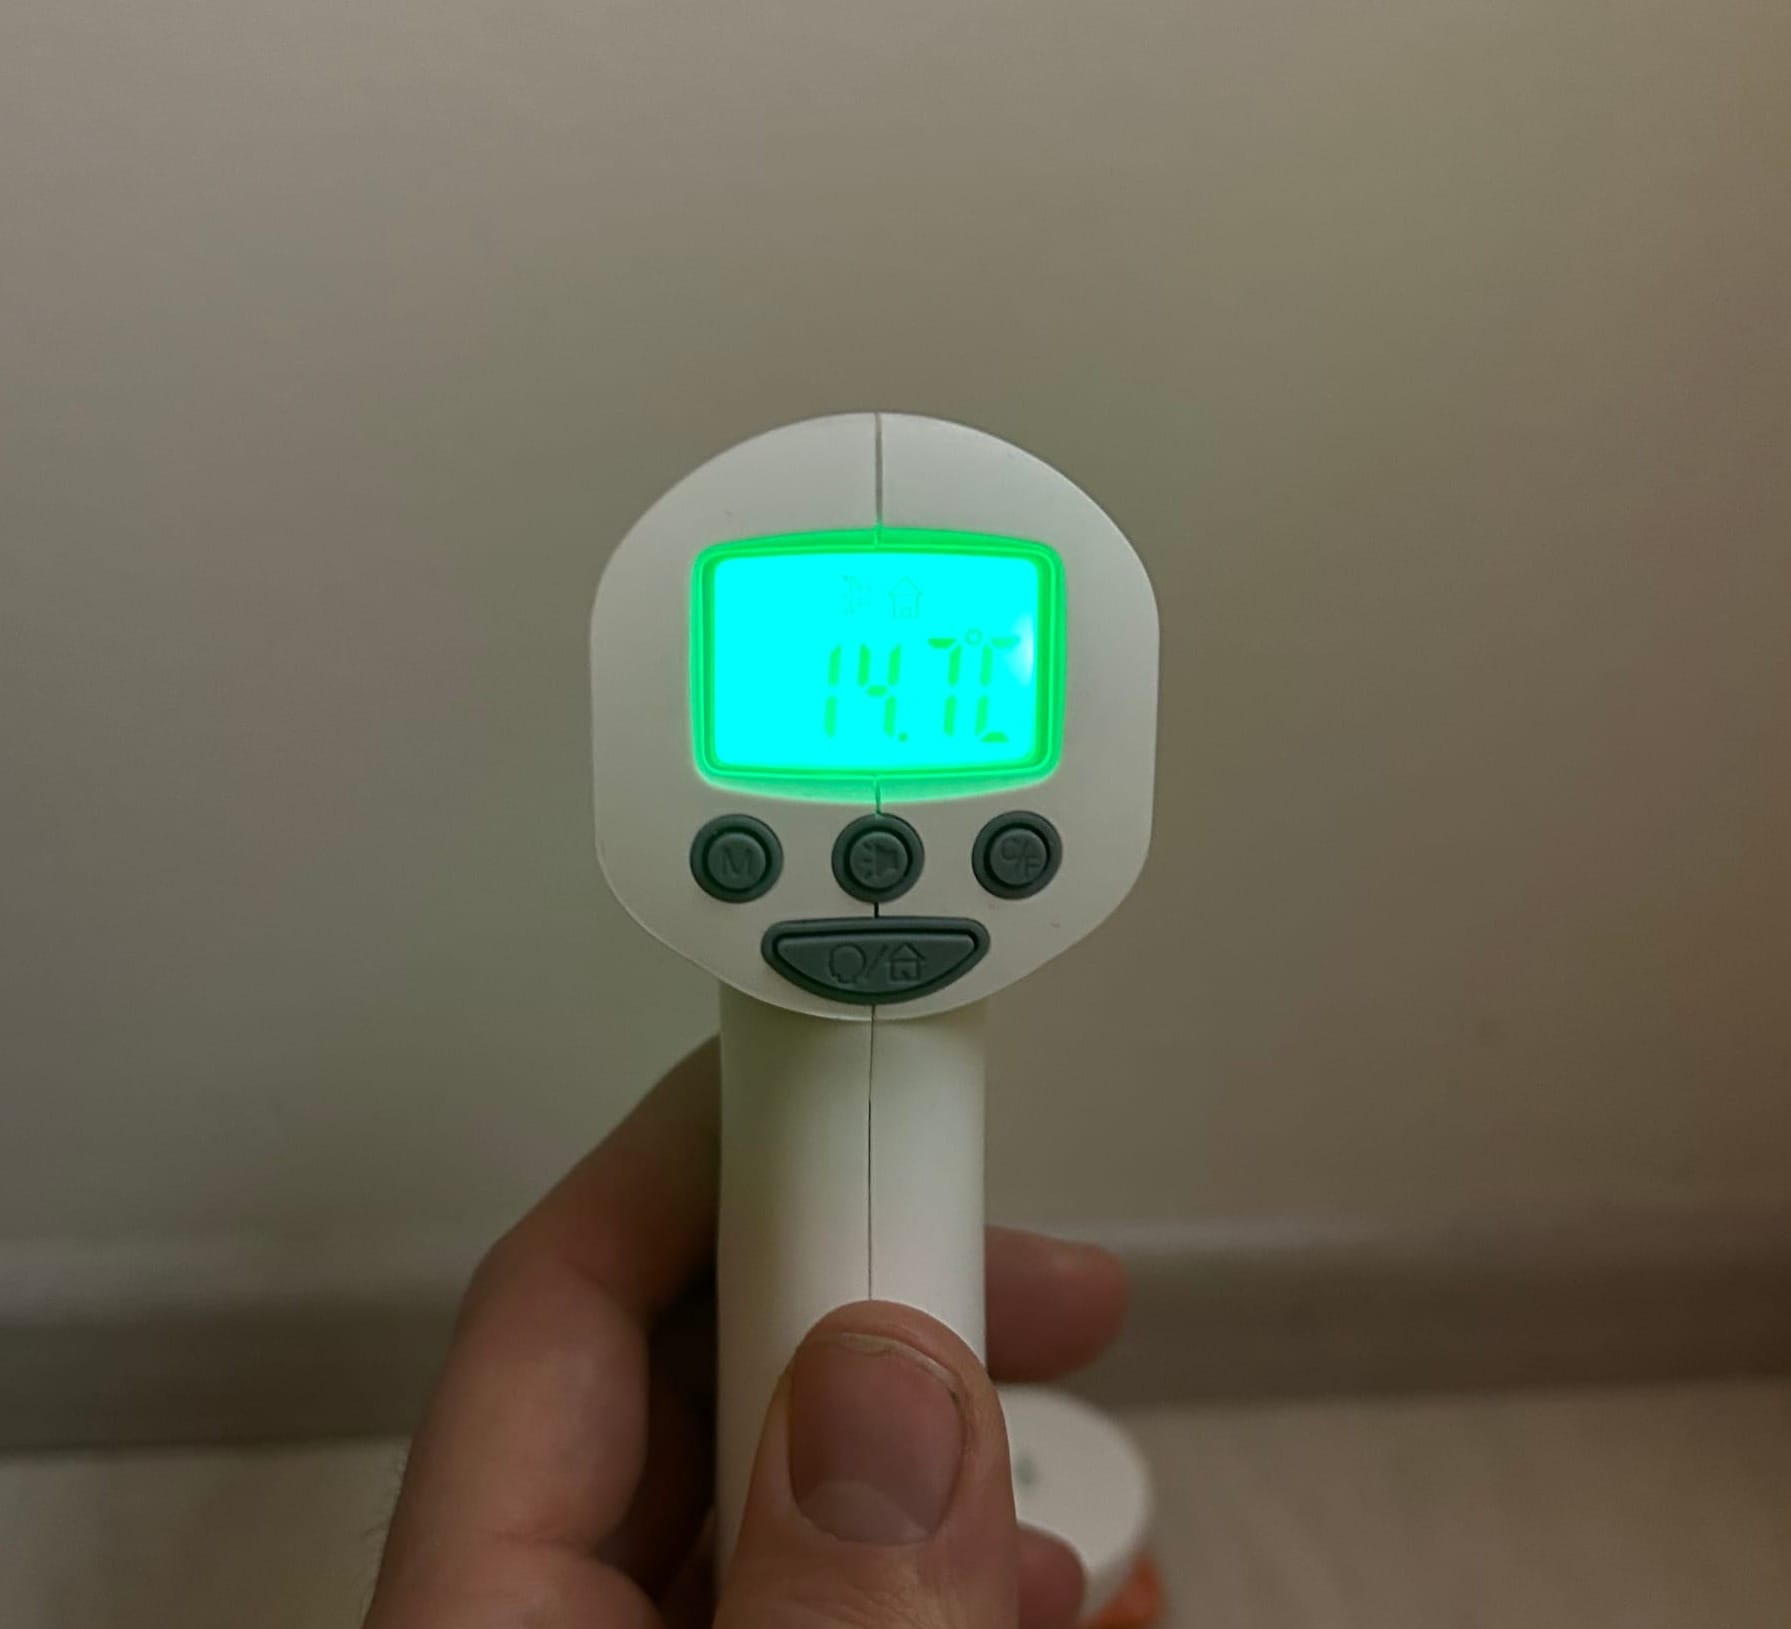
- The Validation: To ensure the sensor was actually reflecting the wall's condition, I used a non-contact infrared thermometer. I found that the wall's surface temperature was almost identical to what the sensor was reporting.
With the data flowing into Home Assistant, I proceed to create the Mold Risk Index, a custom helper that now warns me long before the spores have a chance to take root.
The Core Physics: Why "Room Humidity" is a Lie
Your room's hygrometer might show a healthy 50% humidity, but that value is only valid at the center of the room where it is warm.
Humidity is relative. It describes how much water is in the air compared to the maximum amount that air could hold at its current temperature.1
- Warm air is like a large sponge; it can hold a lot of water.2
- Cold air is like a tiny sponge; it gets saturated very quickly.3
When the warm, 21°C air in your bedroom drifts toward a cold, 14°C exterior wall, that air "shrinks." The amount of water stays the same, but the "sponge" becomes smaller. Suddenly, the relative humidity at the wall surface isn't 50% anymore—it's 78%.
The Science of the Constants (Magnus-Tetens)
To calculate this transition, we use the Magnus-Tetens Formula. This is an empirical fit of the Clausius-Clapeyron equation, which governs the phase transition between liquid and vapor.
In our code, you will see the constants 17.67 and 243.5. Here is where they come from:
- The Saturation Vapor Pressure \((e_{s})\): This represents the pressure exerted by water vapor when the air is 100% saturated.5
- The Magnus Equation: \(e_{s}(T) = 6.112 \cdot \exp \left( \frac{17.67 \cdot T}{T + 243.5} \right)\)
- Why these numbers? These were refined by meteorologist David Bolton (1980) to provide an accuracy of within 0.1% for temperatures between -30°C and +50°C. 17.67 is the dimensionless coefficient for the temperature dependence, and 243.5 represents the temperature offset in Celsius.
You can check your calculations in this interactive calculator: https://mouldpoint.co.uk/
Implementation in Home Assistant
We will create two sensors. The first calculates the Dew Point (the temperature at which liquid water forms). The second calculates Surface Humidity (the actual mold risk).
Step 1: The Dew Point Helper
Go to Settings > Helpers > Create Helper > Template > Template a sensor.
State Template:
{% set T = state_attr('climate.bedroom_valve_thermostat', 'current_temperature') | float(0) %}
{% set RH = states('sensor.room_humidity') | float(0) %}
{% set b = 17.67 %}
{% set c = 243.5 %}
{% if T > 0 and RH > 0 %}
  {% set gamma = log(RH / 100) + (b * T) / (c + T) %}
  {{ ((c * gamma) / (b - gamma)) | round(2) }}
{% else %}
  0
{% endif %}
Step 2: The Mold Risk Index (Surface Relative Humidity)
This is the "Golden Metric." It calculates the humidity specifically in the air layer touching your wall.
State Template:
{% set wall_temp = states('sensor.wall_temperature') | float(0) %}
{% set room_temp = state_attr('climate.bedroom_valve_thermostat', 'current_temperature') | float(0) %}
{% set room_humidity = states('sensor.room_humidity') | float(0) %}
{# Calculate Saturation Vapor Pressure for Room and Wall #}
{% set sat_vp_room = 6.112  e**((17.67  room_temp) / (room_temp + 243.5)) %}
{% set actual_vp = (room_humidity / 100)  sat_vp_room %}
{% set sat_vp_wall = 6.112  e**((17.67 * wall_temp) / (wall_temp + 243.5)) %}
{# Surface Relative Humidity calculation #}
{% set wall_rh = (actual_vp / sat_vp_wall) * 100 %}
Interpreting the Data: The 80% Rule
Why do we care about 80% if water only condenses at 100%?
Mold is biological, not just physical. Spores of Aspergillus and Penicillium are hygroscopic—they can pull moisture out of the air before it even turns into liquid.
Aw (Water Activity) > 0.80: This is the biological threshold. At 80% surface humidity, the microscopic layer of dust and organic material (paint, wallpaper) on your wall becomes wet enough for spores to germinate.
Time Factor: Mold usually needs 24–48 hours of sustained >80% humidity to start growing.
Dashboard & Automation
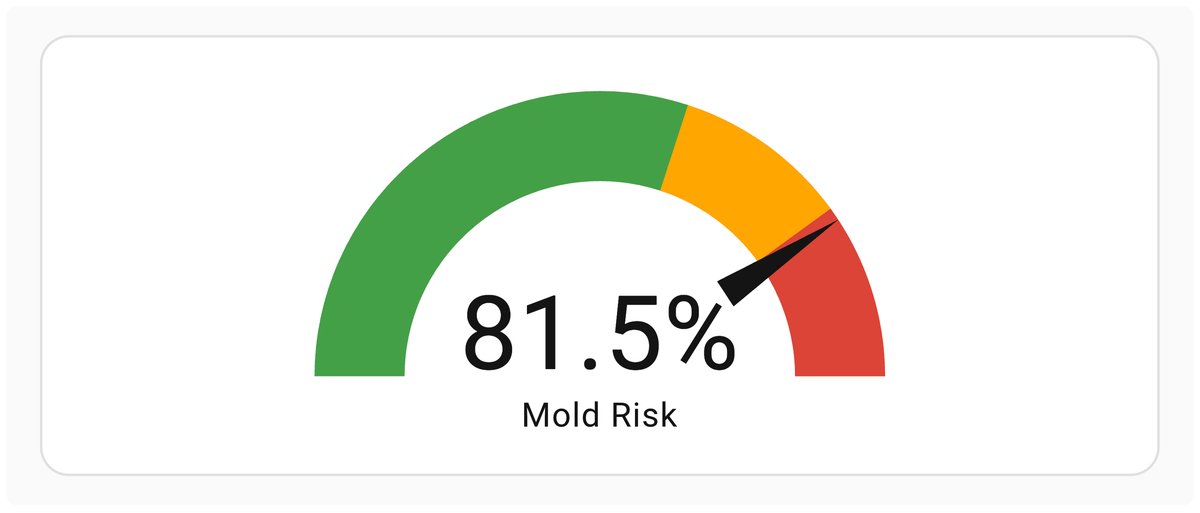
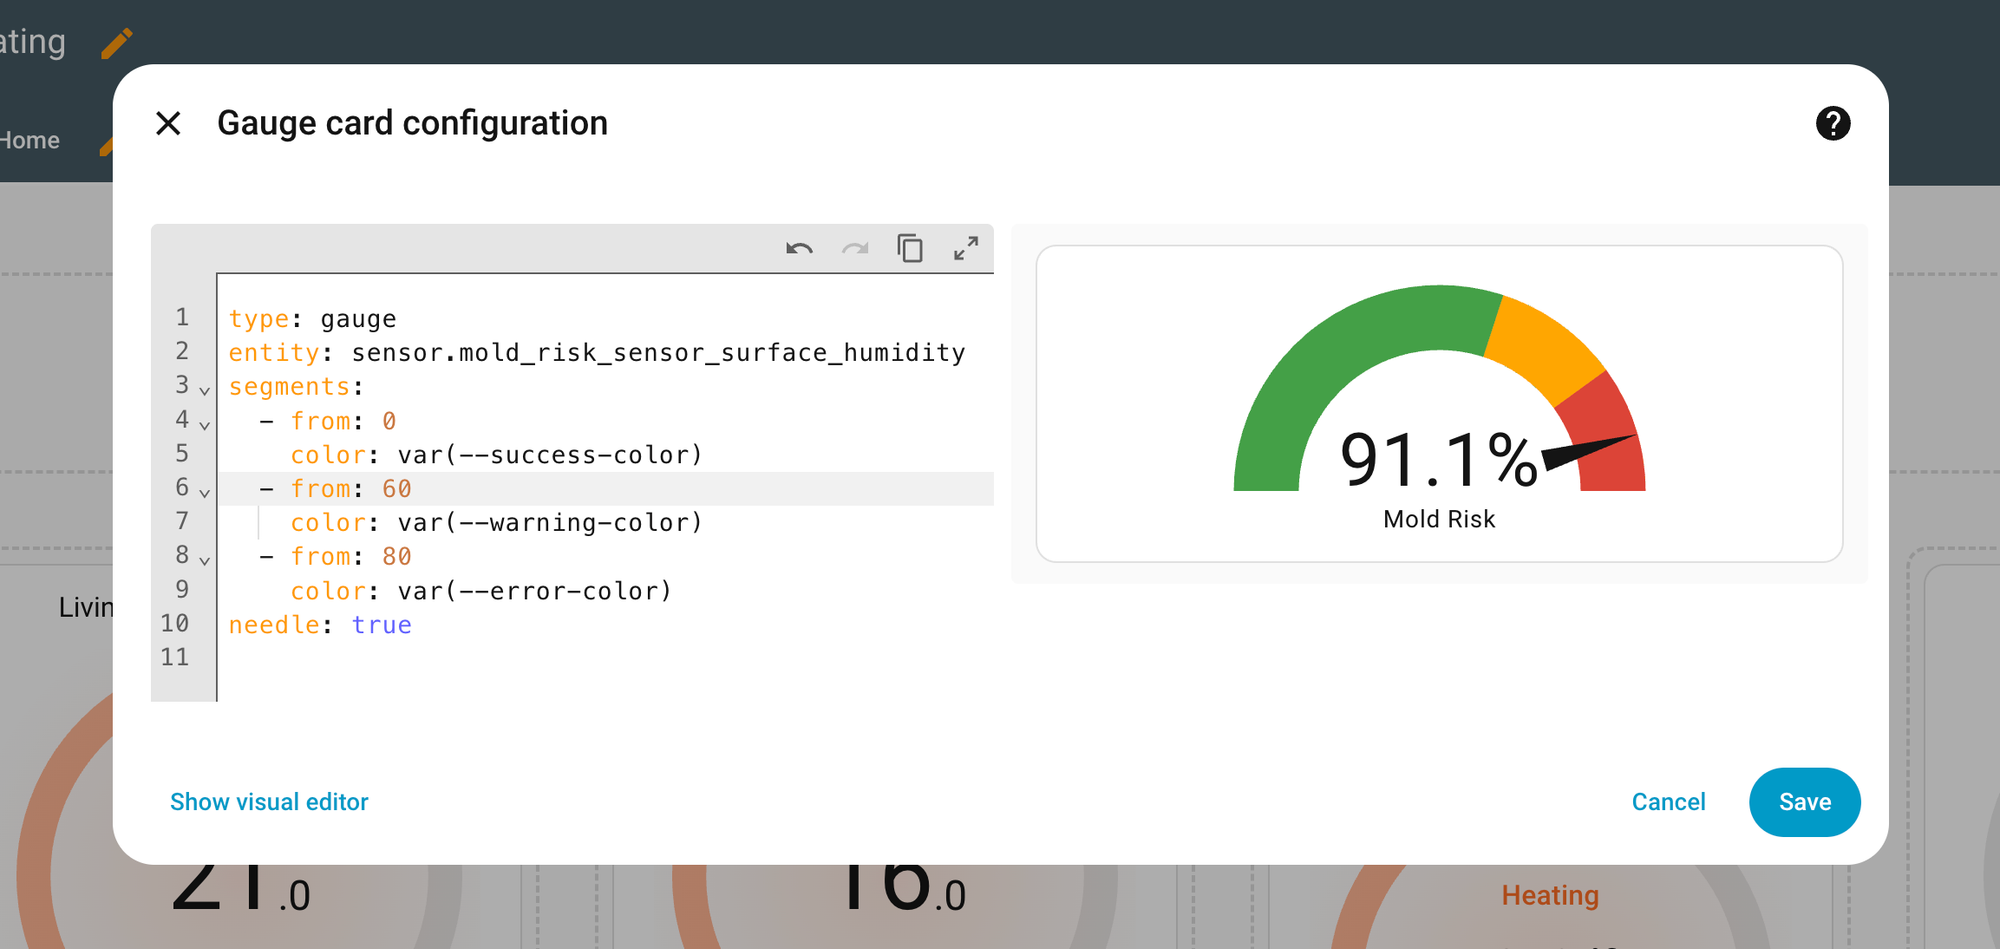
To make this actionable, use a Gauge Card in your dashboard with the following severity zones:
- 0-60: Green (Optimal)
- 60-80: Orange (Mold Risk starts)
- 80-100: Red (Active Growth Zone)
type: gauge
entity: sensor.mold_risk_sensor_surface_humidity
segments:
  - from: 0
    color: var(--success-color)
  - from: 60
    color: var(--warning-color)
  - from: 80
    color: var(--error-color)
needle: true
The "Smart" Intervention
Don't just watch the data—act on it. You can set an automation to:
-
Notification: "Warning: Bedroom wall risk is 82%. Please ventilate."
-
Climate Control: If Wall Humidity > 80%, increase the thermostat target temperature by 1°C to warm up the wall surface.
-
Dehumidification: Turn on a smart-plug connected dehumidifier until the surface humidity drops below 70%.